


Dual Lens Peugeot Boxer, Fiat Ducato, Citroen Relay Reversing + Rear View Camera System for 2006+ Van Brake Light | PM69BLBTW
Our brake light reversing / rear view camera kit with a 7-inch dash mount monitor to fit the Citroen Relay, Fiat Ducato, and Peugeot Boxer vans built after 2006. Now also fits 2022+ Vauxhall Movano vans.
Introduction to our Fiat Ducato, Peugeot Boxer, Citroen Relay 2006 - Present, and Vauxhall Movano 2022+ Brake Light Reversing + Rear View Camera Kit with 7" Monitor
- This listing is for our brake light reversing camera kit with mirror monitor to fit the Citroen Relay, Fiat Ducato, and Peugeot Boxer vans built after 2006. Now also fits 2022+ Vauxhall Movano vans.
- TWIN LENS - Two cameras in one unit. One looking down the back of the vans door for close up parking safety, the other looking back down the road as an always on camera to keep an eye on following traffic. Increases your road safety 100% of the drive, instead of just the 1-2% of the time you are in reverse gear.
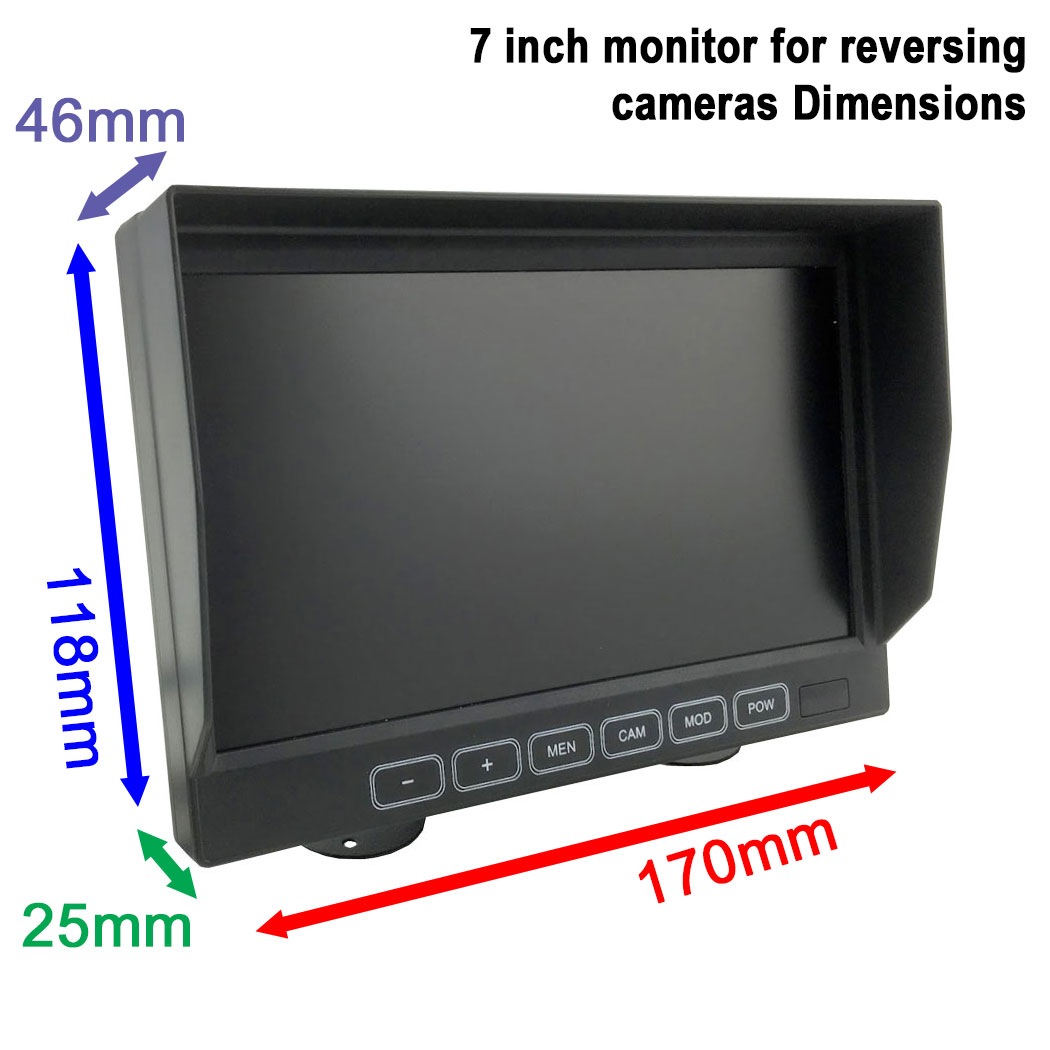
- 7 inch high resolution stand/dash monitor, fitted with an 800x480 digital LCD panel. Built by one of the highest quality, most reliable monitor factories we have come across. Brilliant colours, bright, clear display, as well as the reliability you expect from the forum favourites - REVCAMUK.
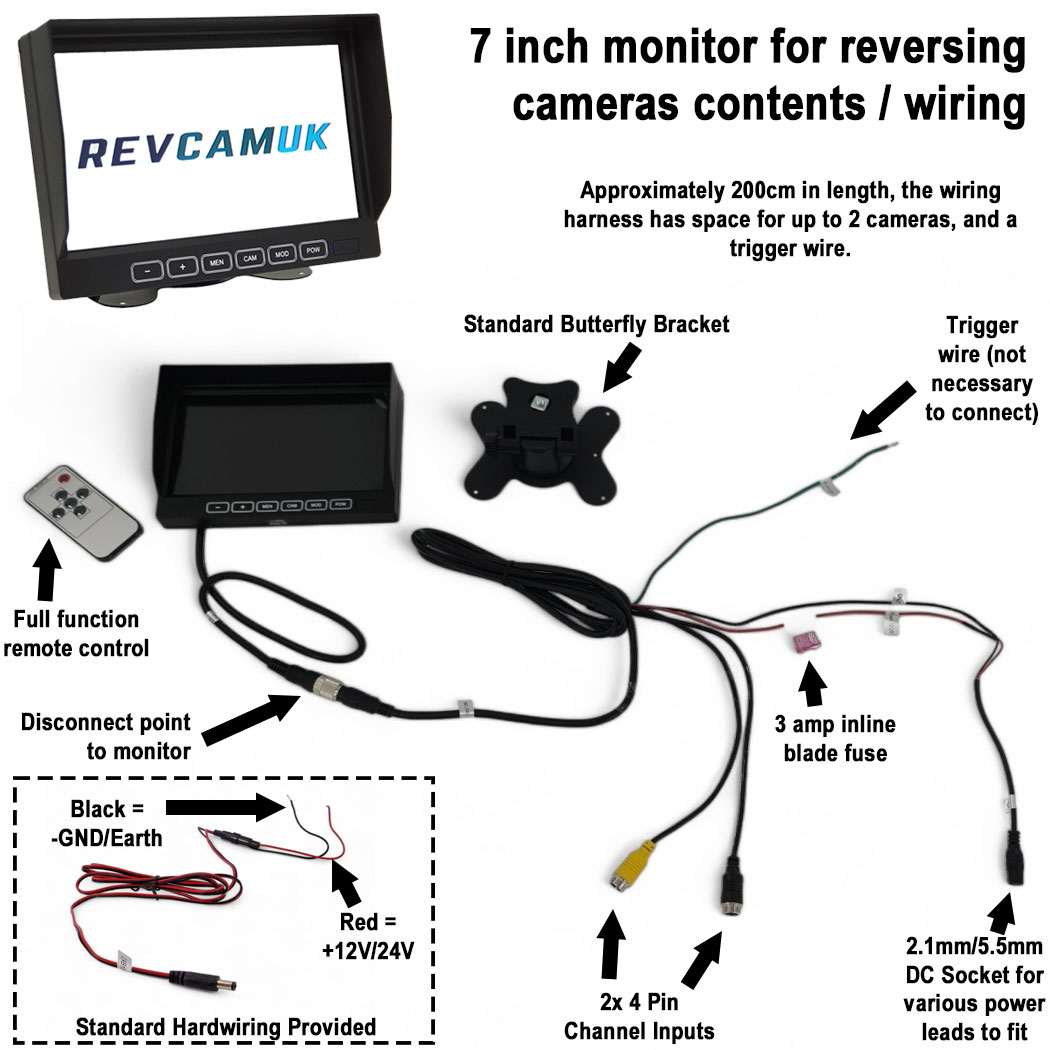
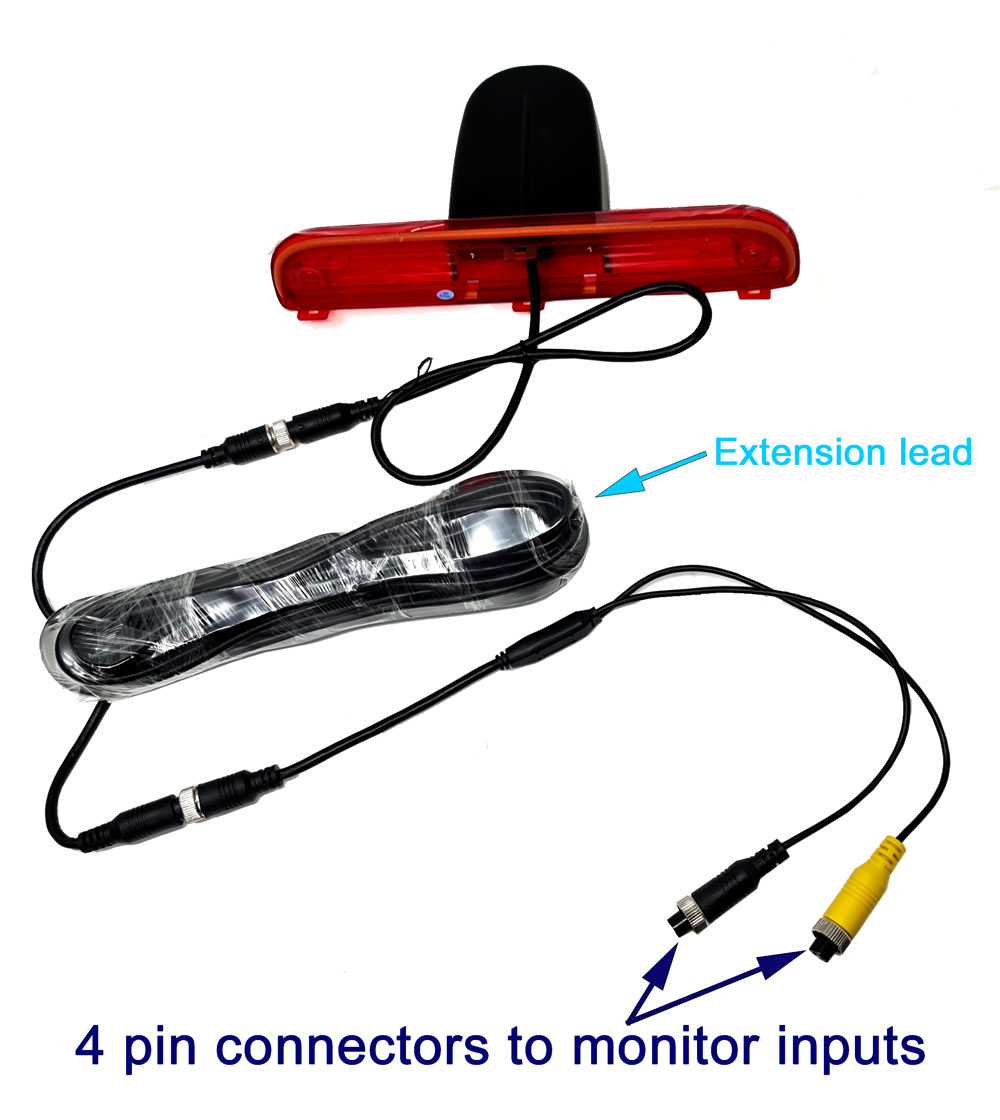
- This brake light reversing camera kit is supplied with 4-pin aviation connectors on all the cabling. We prefer the 4-pin version because it means the monitor can provide power to the camera, and this avoids CANBUS issues that can occur if taking power from the reverse light. The monitor we use provides power down an all-in-one screw together cable making fitting easy.
- We use a high res image sensor, namely the 1/3" PC4089 700TVL sensor. Coupled with a 2.6mm 4 layer glass lens (some cheaper cameras use 2xglass 2xplastic which eventually turn cloudy due to sun exposure) to give approximately 130° diagonal field of view.
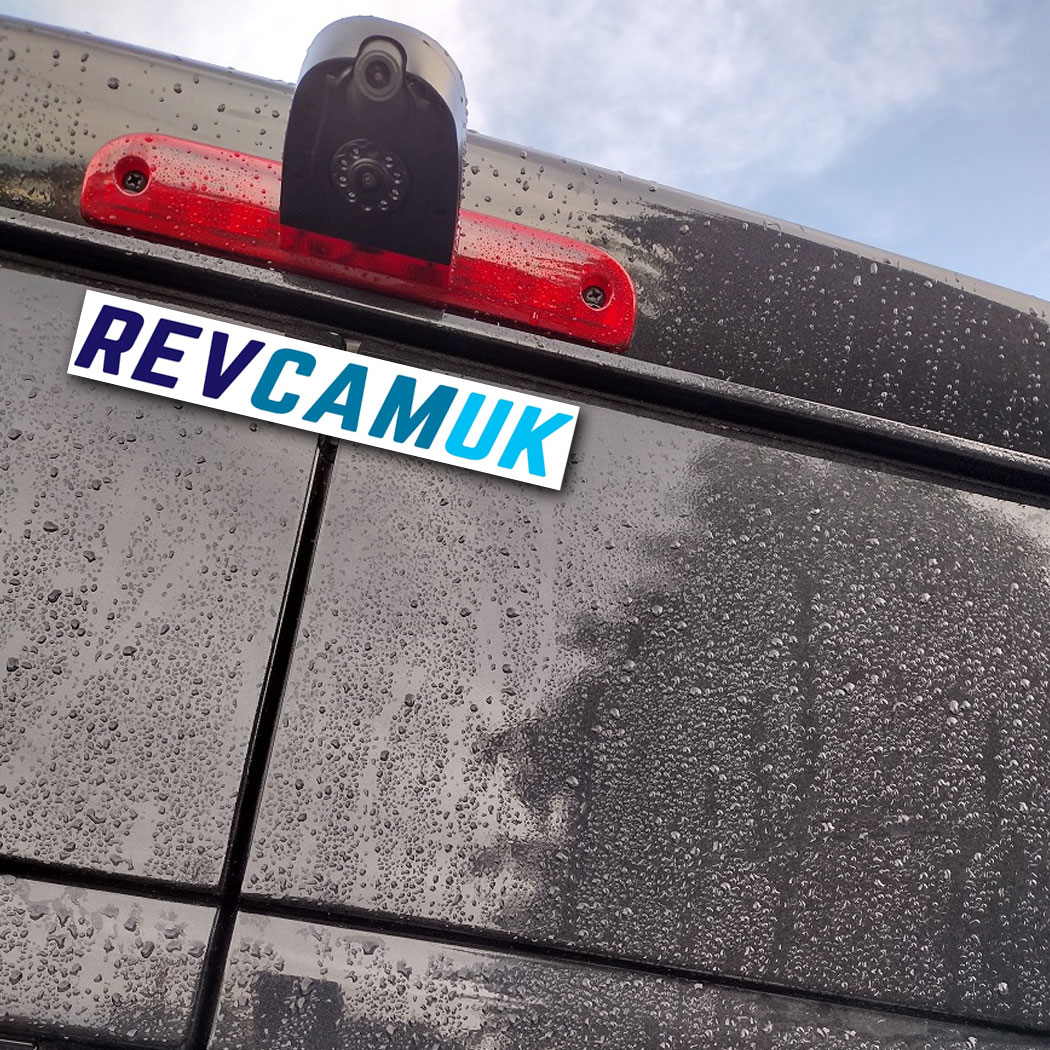
- This version screws in from the outside, simply remove your old light by removing the two original screws, next transplant the light strip from the old brake light, then place it in to the new brake light camera and re-affix up with the two original screws.

Quality Image Sensor and Lens
- We use premium modern 700TVL CMOS sensor to capture the image, coupled with a very high quality 4x glass layer composite lens. All glass lenses avoid the fading experienced with the cheaper 2x plastic, 2x glass lenses common on cheaper reversing cameras.
- This brake light reversing camera has the lens fitted externally, which means you get a wider field of view when compared to models that have the lens mounted behind a glass cover.
Tidy Factory Look Fit
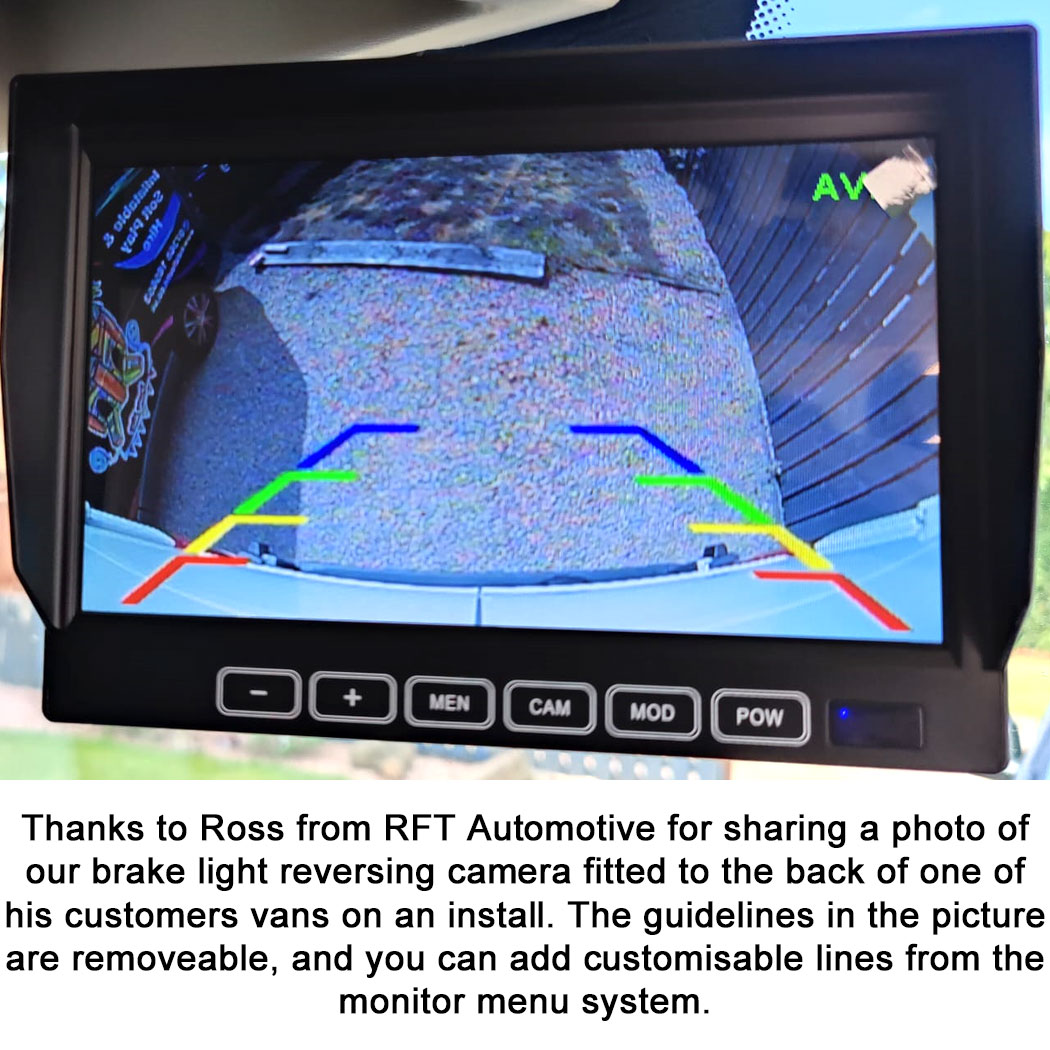
The photo below was sent in by Ross, from RFT Automotive, one of our regular trade customers that trust us to supply his customers with the best picture quality and reliable reversing camera system available. Thanks for your photo Ross, always a tidy install for any customers looking for an installer from Ellon in Aberdeenshire.

Guarantee and Support:
- Comes with a 2-year guarantee.
- Offers lifetime support from UK specialists.

Additional Bracket Options
In all cases you will receive the standard U bracket that comes with this monitor. To add one of the additional monitor brackets to your kit bundle please see the descriptions/photos below. We also have a YouTube video showing the various bracket options below.
ACC035 - "Butterfly" Bracket option *Supplied as standard with this kit
So called because the base looks like a pair of butterfly wings. Fitted with an adhesive pad on the base, peel the protective layer off and stick to your clean dashboard. Additional screws can be used if you feel it needs reinforcement. The square nut fits in to the channel of your monitor, whilst there is a screw to the rear of the bracket that will then screw in to the square washer until it locks the two together.

ACC041 Quick Release Bracket option
The quick release bracket is one of the most popular bracket options. The bracket has a removable mounting plate that attaches to the rear channel of the monitor. This plate can then slide in to the bracket that is mounted to the dashboard and locks. To release, simply pull back the thumb switch at the rear, then slide the monitor up and out. Our monitors have disconnect points around a foot away from the monitor to allow it to disconnect. A bracket that makes initial install a little quicker, as well as allowing more adjustability in positioning of the display. Adhesive pad base for sticking to clean dashboard with bendable feet.

ACC705B - Heavy Duty Rear Mount Bracket Option
The most sturdy of all of our rear mounted dash mounts, all metal design. Monitor slides on to the bracket, which has a rear adjustment rotational wheel to lock the monitor to the bracket. Self adhesive base, with bendable "feet" for curvy dashboards. You can add screws if required.

ACC038 - Suction Mount Bracket Option
Only designed for temporary mounting eg. moving a monitor from one vehicle to another. This bracket has strong suction, people are often shocked by how strong it is. We use these when we road test new monitors for temporary mounting. A ball joint allows for good adjustment to give the monitor the optimum viewing angle.

ACC20540 - "Banana" Ceiling Mount Swan Neck Bracket Option
The ceiling mount bracket is a very sturdy and adjustable bracket mount for the monitor in this kit. Two screws secure this to the ceiling or plastic trim of the vehicle. The other side attaches to the channel on the back of the monitor and secures with a twist of the locking wheel. Release the tension by turning the hand screw knob on the left to allow the ball joint to rotate clockwise and anticlockwise, or up/down/left/right. These have been a very popular option since they were introduced.

Installation and Power Options:
- Easy installation with various power options that plug in to a socket on the monitors wiring harness/loom.
- Single power connection powers the entire system.
- Standard hardwiring ALWAYS included even when adding the additional connector options.
- Choose a lighter plug for the easiest plug and play solution. Some customers order this just for testing purposes before using one of our hardwiring options (fuse tap or bare wire) afterwards.
- Choose one of our fuse taps for an easy hard wire installation. We have had them designed so that one end plugs in to the monitor power socket on the end of the wiring harness, whilst on the other side of the 200cm lead has a mini blade or a standard blade fuse tap aka piggyback fuse holder, as well as a chassis earth/ground terminal fixing (find a screw/bolt connected to bare chassis and fix to this). See our downloadable PDF instructions on how to install a fuse tap/piggyback fuse holder to your vehicles fusebox.

For more information including main reversing camera kit instructions, and monitor instructions, please click the tab for PDF instructions. If you would like any information/questions that may not be present, please contact us.
Additional Monitor Bracket Options
To add a discounted price additional monitor bracket to your product bundle, please see the descriptions/photos below. We also have a YouTube video showing the various bracket options below.
ACC035 - "Butterfly" Bracket option
So called because the base looks like a pair of butterfly wings. Fitted with an adhesive pad on the base, peel the protective layer off and stick to your clean dashboard. Additional screws can be used if you feel it needs reinforcement. The square nut fits in to the channel of your monitor, whilst there is a screw to the rear of the bracket that will then screw in to the square washer until it locks the two together.
ACC041 Quick Release Bracket option
The quick release bracket is one of the most popular bracket options. The bracket has a removable mounting plate that attaches to the rear channel of the monitor. This plate can then slide in to the bracket that is mounted to the dashboard and locks. To release, simply pull back the thumb switch at the rear, then slide the monitor up and out. Our monitors have disconnect points around a foot away from the monitor to allow it to disconnect. A bracket that makes initial install a little quicker, as well as allowing more adjustability in positioning of the display. Adhesive pad base for sticking to clean dashboard with bendable feet.
ACC705B - Heavy Duty Rear Mount Bracket Option
The most sturdy of all of our rear mounted dash mounts, all metal design. Monitor slides on to the bracket, which has a rear adjustment rotational wheel to lock the monitor to the bracket. Self adhesive base, with bendable "feet" for curvy dashboards. You can add screws if required.
ACC038 - Suction Mount Bracket Option
Only designed for temporary mounting eg. moving a monitor from one vehicle to another. This bracket has strong suction, people are often shocked by how strong it is. We use these when we road test new monitors for temporary mounting. A ball joint allows for good adjustment to give the monitor the optimum viewing angle.
ACC20540 - "Banana" Ceiling Mount Swan Neck Bracket Option
The ceiling mount bracket is a very sturdy and adjustable bracket mount for the monitor in this kit. Two screws secure this to the ceiling or plastic trim of the vehicle. The other side attaches to the channel on the back of the monitor and secures with a twist of the locking wheel. Release the tension by turning the hand screw knob on the left to allow the ball joint to rotate clockwise and anticlockwise, or up/down/left/right. These have been a very popular option since they were introduced.
Power Connection Options
You have the option to add additional leads that plug into a DC socket on the monitor wiring harness. You will always be supplied with the standard power wire, which gives you a red wire and a black wire to solder or crimp to a power supply.
On the drop-down menu you will notice there are two selectable options: one to add a lighter plug, and one for a fuse tap. Scroll down for details on each option.
Lighter Plug
Selecting this option adds an additional lighter plug lead, which attaches to a socket on the end of the 300cm monitor wiring loom/harness. Some customers choose this option simply to test their new kit before hardwiring it permanently.

View full details of this power option (opens in new tab)
Fuse Tap (Mini Blade or Standard Blade)
Selecting this option adds an easy-wire fuse tap power lead with a built-in earth terminal connector.
We designed and had these products produced in 2023 to allow customers to hardwire a reversing camera system easily, with minimal tools required. Fuse taps are already popular for dash cam installations, so we adapted them specifically for reversing camera kits.
Unlike many fuse taps, our easy-wire kits come supplied with 2 metres of twin cable (power and earth) already attached. The wires can be separated if you need to route the earth away from the fuse box.
Choose a fuse position that is live only when the ignition is switched on. Remove the original fuse and place it into the spare slot on the fuse tap. The correct rated fuse for the camera system is already installed. Insert the fuse tap into the fuse box and secure the earth terminal to a suitable chassis bolt or screw.
The mini blade fuse is the most commonly used type on modern vehicles.

View full details of this power option (opens in new tab)
Standard blade fuse taps are still very common, even on newer vehicles.

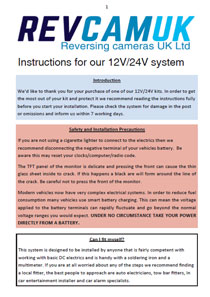
PDF Instructions
We aim to provide as much information as possible to assist with both the installation and use of our equipment (something we here is very rare nowadays). If you require any further assistance with any aspect of the fitment then please contact us. Also, if you feel anything could be added to our instructions or a sticker produced for the box to assist in guidance, please let us know. We get better with your assistance.
 Click preview image to download the PDF file | For all of our cabled reversing camera kits Our main 4 pin reversing camera kit instructions. We prefer 4 pin screw locking connector cables in our kits for numerous reasons (no canbus issues, stable voltage, ability for always on, reliability, and heavy duty connectors). This downloadable PDF file will give you all the advice you will need. Some of our cameras will come with extra specific guidance or manuals to help that specific install. |
 Click preview image to download the PDF file | 7 inch Display Instructions If you choose the PM60 series kits you will have the MON16/MON745 monitor supplied, which is covered by these instructions. They will guide you through the various menu functions including rotation, adjustable guidelines, trigger delays, interval mode, and display settings. |

Monitor
7” Colour LCD screen
Power supply: 12V/24V
Power Consumption: 4W Max
Digital Screen Resolution: 800 x3(RGB)x480
Contrast: 500:1
Brightness: 400cd/m2
Viewing Angle: U: 50 degrees/ D: 60 degrees, R/L: 70 degrees
Operating Temperature: -10C to +65C
Storage Temperature: -30C to +80C RH90%
2 Inputs
PAL/NTSC/AUTO
Mirror/Normal Switch on both channels
Adjustable guidelines when using trigger wire
Full function Remote Control
Driving camera (upper camera)
Sensor: 1/3 PC4089 CMOS
Effective Pixels: 976(H) x 592(V)
TV line: 700 TVL
TV system: NTSC
Lens: 2.6mm
Min illumination: 0.1 LUX
Waterproof: IP68
View angle: V 65 degrees, H 80 degrees D 105 degrees
Camera lens adjustment: 20 degrees up and down
Voltage: 12 volts
Current consumption: 150mA
Operating temperature: -20 to 70 degrees C
Certificates: FCC, CE, E-mark, RoHS
Connector: 4 pin aviation
Reversing camera (lower camera)
Sensor: 1/3 PC4089 CMOS
Effective Pixels: 976(H) x 592(V)
TV line: 700 TVL
TV system: NTSC
Lens: 1.9mm
Min illumination: 0.0 LUX (IR LED on)
IR LEDs: 8 pcs
Night vision: 10m
Waterproof: IP68
View angle: V 85 degrees, H 130 degrees D 160 degrees
Camera lens adjustment: 20 degrees up and down
Voltage: 12 volts
Current consumption: 150mA
Operating temperature: -20 to 70 degrees C
Guideline: Optional (some have a trigger wire to select)
Certificates: FCC, CE, E-mark, RoHS
Connector: 4 pin aviation
Mainland UK Shipping
We have three postage options to select from during checkout (on larger items eg kits there will be two options):
Royal Mail Tracked - Smaller / Lighter weight orders. This will be sent via Royal Mails Tracked Service. They will send emails/SMS to inform you of the tracking events. This option won't be shown for heavier weight orders.
DPD 2 Day. Small or large orders. This will be sent with DPD Local and should arrive within two working days (if you place the order before 12:30PM).
DPD Next Day. Small or large orders. This will be sent with DPD Local and should arrive the following working day (if you place the order before 12:30PM).
Highlands and Islands UK Shipping
We offer a 2-3 day service fulfilled with either Royal Mail Post, or Parcel Force. The prices charged are identical to mainland UK. Small orders will be sent via the post, larger orders via Parcel Force.
Northern Ireland
We offer a 2-3 day service fulfilled with either Royal Mail Post, or Parcel Force. If your order is over £135 ex VAT, you may find that duty (tax) is due from the shipping company. If you are a business in Northern Ireland, please provide an EORI number and/or UKIMS number in the customer notes box of the checkout, which we will use when booking in. This is because of the new Windsor Framework introduced in 2025.
Outside of the UK Shipping
We shop around when selecting the best method for Europe (we avoid the cheap budget couriers due to parcels being lost). Southern Ireland is always sent via DPD. Other countries will usually be either Parcel Force, UPS, or Fedex. Please note that we require a phone number for international deliveries. Also if you are a company in Europe, a VAT number or EORI number will help speed up customs.
We remove the UK VAT (Tax) when any country other than the UK is selected in the shopping basket or checkout. From this point all prices on the site drop down to exclude VAT. If you are from the Channel Islands, please select Jersey / Guernsey from the country list in order to remove UK sales Tax.
60 day "Change of Mind" policy
We understand that for whatever reason you may need to return your purchase. We provide a 60 day opportunity for you to do just that. Simply give us an email or a phone call to let us know it is due back. You are responsible for the shipping back to us but you will receive a full refund including the original shipping we charged you for your order. We recommend getting a signed for or proof of postage when posting back to us.
All we ask is that you return the items in the condition they were sent in, with the packaging present. You are welcome to have temporarily tested the product and unravelled things, but if you have cut wires, soldered, glued, installed and used for a while then this wouldn't be suitable for returns under the change of mind policy.
