


White Sony CCD Roof Overhang Reversing Camera Kit with Mirror Monitor| PM37W-SD
This kit comes with a 7" digital LCD panel built into a clip-over mirror monitor, bundled with a white Sony CCD roof mount (Sharkfin) reversing camera and cabling.
7" Mirror Monitor + Black Roof Mounted Overhang Reversing Camera Kit Details
This mirror mounted reversing camera kit includes a black roof mount reverse camera. The high-resolution digital LCD panel on the monitor and the Sony 1/3" CCD 700tvl image sensor on the camera means you can expect a good picture quality day and night. The kit offers :
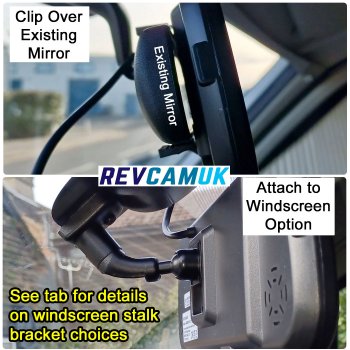
Choice of Mirror Mounting Options - We stock two types of mirror monitor, made by the same factory to the same spec but with different rear mounting panels. The clip over type has strong spring loaded lower clips that pull down to clamp against an existing interior mirror to provide a secure fit. To attach directly to the windscreen please see our info tab named "mirror mount options" for more details.
High Resolution Display - Fitted with one of the best quality 7" hi-res digital LCD panels we have seen, this mirror monitor will give you rich colours, a bright picture that is easy to see, and easy to view even when sat at an angle to the display. This resolution can handle even the highest resolution of traditional CVBS signal reversing cameras (CVBS signal still makes up 95%+ of all existing reversing camera systems).
High Resolution Reverse Camera - This bracket camera is fitted with a Sony 811 700tvl 1/3" CCD image sensor. Very widely respected in the CCTV industry. The image sensor is the part of the camera that captures the picture detail, so it has a huge impact on picture quality.
Add Adjustable Guidelines to Image - The menu system on this monitor is one of the most advanced that we have come across. One of the features is that you can add guidelines to the picture, as well as move them about. You can even choose to measure the distance to the lines and change the numbers, as well as specifying if you wish the units to be displayed as M or ft. To use this feature you must use the green reverse trigger wire, if you activate them in the menu the lines will only display when the green trigger has power e.g. when in reverse. For more details please see page 6 of our rear view mirror monitor instruction manual.
Easy-Fit Wiring - Using the 4 pin aviation cabling, this system is easy to wire up as the monitor provides power to the camera via the all in one locking waterproof connector cables. We have used 4 pin cables since the mid 2000's, it has now become the dominant cable connector in the industry. Strong and durable connectors, they can even be left outside in wet and freezing conditions.
Convenient Location - This monitor is one of the most popular for cars, vans, and motorhomes because it is a natural place to look when you want to view behind you, as well as keeping the dashboard clear for other devices you may use.
Two Year Guarantee and Lifetime Support - This monitor and reversing camera kit should last a very long time without any issue. We guarantee it to be free from faults for two years. After two years we are able to offer low cost repairs on the monitor to keep your system in good condition and avoid extra time or expense installing all new components. We also keep good stock of spare parts such as wiring harnesses, cables, and cameras should you decide to take the monitor out of the vehicle with you when you sell your vehicle but leave the wiring where it is.
Choice of power options - We have had a DC socket added to the monitors wiring harness that allows you to select various power lead attachments to plug in to this. As standard you are supplied with a lead that terminates in a red wire (+12V / +24V) and black wire (Earth / Ground). You may also choose from a cigarette lighter 12V plug option, or an easy wire fuse tap option that allows you to hardwire the whole kit without soldering or crimping. Simply remove a fuse from the fuse box, insert it in to the fuse tap, then connect the earth terminal to a chassis screw/bolt. See the power options tab for more details.
Optional slimline 8mm disconnect point on extension cable - The cable length selection drop down menu includes an 8mm disconnect point option on selected cable lengths. If you select this option we will supply a version of the main extension cable that has a small 8mm diameter disconnect point, so that the larger connector is temporarily removed to allow for easy feeding through the vehicle and any tight gaps/cupboards etc you may encounter. The disconnect is 1M from the front of the cable, so it will re-join close to the monitor and convert back to the 4 pin screw connector for the monitor input.
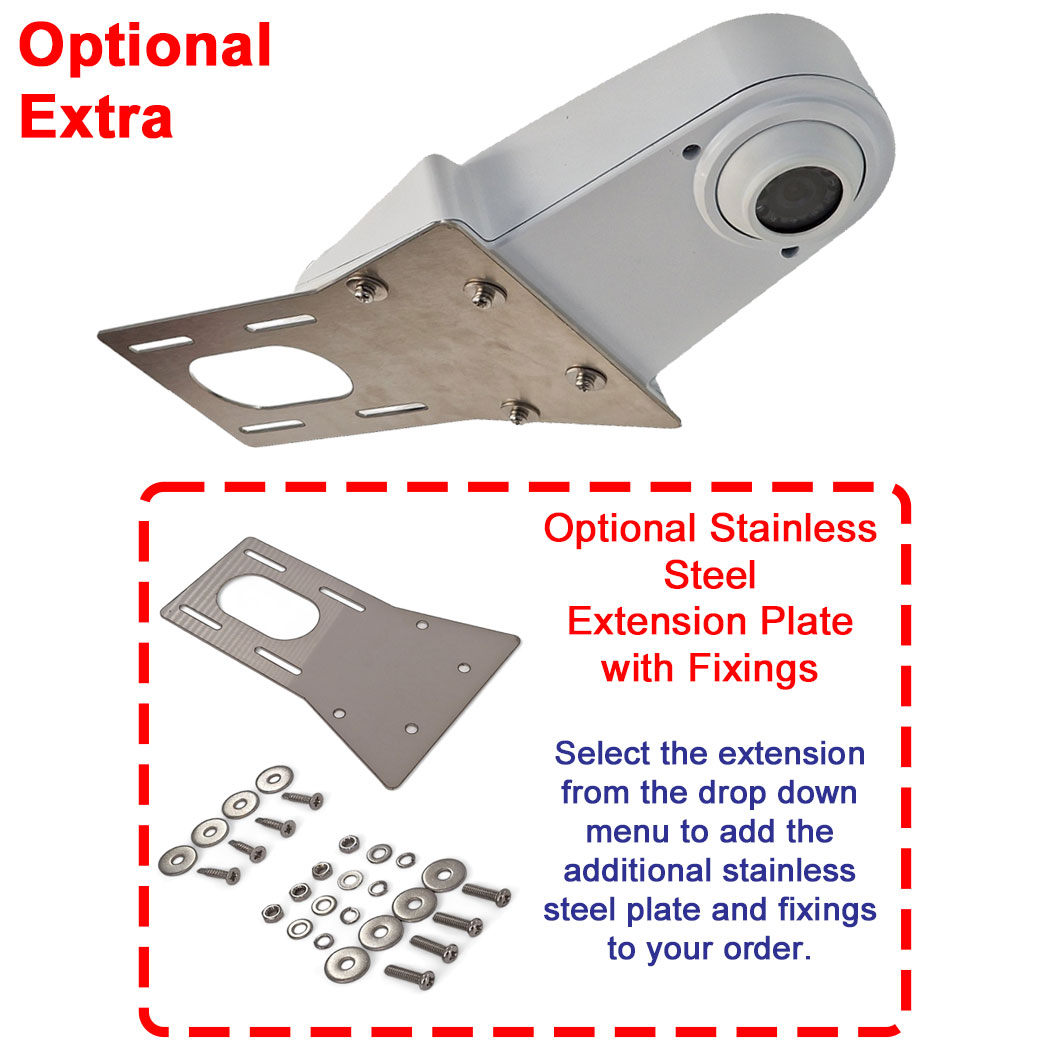
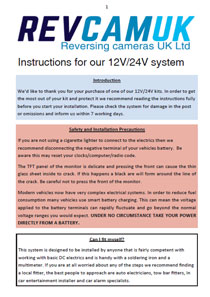
Optional extension plate for the camera - If you have thick rear doors on your vehicle to get past you may require an extension plate. This can be added to the kit by selecting the option above (see picture below).

For more information including main reversing camera kit instructions, and monitor instructions, please click the tab for PDF instructions. If you would like any information/questions that may not be present, please contact us.
Rear View Mirror Mount Options Details
We have various mounting options for the rear-view mirror reversing camera kits. Please see the options below. Remember to carefully check the description and photos, as some mounts look similar. We only stock the most common vehicle mounts (usually vans). Be aware that if there is a plastic cover over the mounting plate this may not fit back on with a bracket in place.
Clip-over Existing Mirror - This is the most popular option, especially if you already have an interior mirror to clip on to. This option has a version of the mirror monitor that has strong spring loaded clamps to attach it to the old mirror.

ACCMB1 - Mercedes Sprinter with Auto Lights / Wipers Option - We usually see this type of mounting on Mercedes Sprinter vans that are fitted with auto lights or wipers. 90 degree twist (clockwise from 9 o'clock position to fit).

ACCMB2 - Some Ford / Universal - Most commonly seen on Ford vehicles e.g. Ford Transit. Also known as the universal bracket because the mounting plate (button) that works with this bracket is the easiest to glue on. We stock the button and glue kit (see further down). Slides down from above.

ACCMB3 - Some Volkswagen - We usually see this mounted to Transporter, various cars, and Crafter vans built after 2017. 90 degree twist (clockwise from 9 o'clock position to fit).

ACCMB5 - Some Mercedes / Renault / Vauxhall - Most commonly found on Mercedes Sprinters without auto lights/wipers, as well as older Renault Trafic and Vauxhall Vivaro vans. Mounts by sliding down from above.

ACCMB6 - Universal Ceiling Mount - Allows you to attach the monitor to the ceiling.

ACCMB7 - Some Citroen Relay / Peugeot Boxer / Fiat Ducato / Iveco Daily Vans - We typically see this fitted to earlier models of Relay/Boxer/Ducato vans, as well as recent Iveco Daily vans. Slide down from above fitment.

ACCMB2 + MP35 - Some Citroen Relay / Peugeot Boxer / Fiat Ducato / Ford Transit / New Vauxhall Vivaro - Most commonly found on more recent Ducato/Relay/Boxer vans. Usually this will be hidden by a round plastic circular cover. There will also be a spring underneath the cover that will need to be twisted anti-clockwise to remove (be careful in case it pings off in the direction of your eyes).

ACCMB2 + Button + Glue - Universal - adds a button with Loctite 319 interior mirror adhesive for ACCMB2 bracket to attach to - This is ideal if you find your vehicle doesn't have any mounting plate fitted, or has one that we have no bracket to fit to. This bundle will provide you with a universal bracket, a universal button/mounting plate, and the Loctite 319 interior mirror adhesive required to fix this to the windscreen. We provide full detailed instructions on how to achieve a good, strong bond.

You can now choose to upgrade your kit to the latest AHD technology. This upgrades both camera, and monitor spec. Read more about the technology below.
What is the difference between traditional reversing cameras, and the latest AHD reversing cameras?
For many years reversing cameras have used a technology called CVBS (composite video baseband signal). This is the same technology that you will have seen in the past on devices such as DVD players. CVBS has limitations as to the resolution that it can transmit, typically this is around 480i.
For years, the world has come to see ever increasingly high-definition cameras get developed. Until recently we haven’t seen this trickle down to things like reversing cameras.
The reason for this delay is due to the problems in transmitting high-definition video across distances greater than a few meters. Digital video signal cables are limited to short distances without the use of repeaters. For example, HDMI cable has not long advanced to be able to handle around 15ft before signal degradation becomes an issue.
AHD is known as Analogue High Definition; it allows a High-Definition video signal to travel through a traditional analogue coax cable. This new technology solves the transmission distance limitations issue and allows the reversing camera world to finally experience a substantial increase in both definition and dynamic range.
With it being a new technology, how can I be assured I won’t experience any teething problems?
The truth is that AHD has been around for a number of years now, and it DID have teething problems. This is why we only brought in our range in early 2022, once we were convinced it was stable enough.
We did bring some small batches of AHD kits a few years earlier, selling them cheaply to assess how they performed in the real world. For the most part they worked well, but they weren’t perfect. The biggest problem was something the factories termed “flicker”. In 2021 we were informed that this had finally been solved, and all of our samples / road tests confirmed this.
So are all AHD cameras better than the traditional cameras?
The short answer is no.
As always, the answer is more complex than just comparing numbers. For example, you can get 720P/960P/1080P camera chipsets for just a few quid (£). The cheap camera chipset will give you a worse picture than a good quality traditional CVBS 480i camera, despite its “bigger numbers”.
The only real way we were able to decide on which image sensors we would stock in our new range, was to test them out in the real world with lots of samples.
If the monitors aren’t also 1080P, then what is the point in using a 1080P camera?
Resolution isn’t a massive problem when it comes to the smaller screens used in reversing camera monitors eg 7 inch. The 800x480 (384,000 pixels) digital hi resolution panels used on our standard premium systems have pixels so small it is hard to see them, even close up! The only time we hear people mention resolution as a problem, is when discussing the cheaper analogue LCD panels that have 480x234 pixels (112,320 pixels) displays - these you can easily see pixels.
Our AHD monitors are upgraded to 1024x600 pixels (614,400 pixels), which is a 60% increase compared to the digital LCD. They also use IPS panels instead of standard LCD, which allows for better colour replication.
During testing we notice that some of the best AHD camera image sensors are 1080P only, such as the Sony IMX307 sensor. When you compare this sensor to cheaper 720P/960P/1080P AHD sensors, you see a big difference in night-time picture, as well as when there are differences in light levels across the picture eg. bright headlamps in an unlit area, or shadowy areas on a bright day.
So although you won’t experience full 1080P, when it comes to screen sizes that are substantially smaller than your TV at home, and a lot closer to your eyes, it isn’t really noticeable. Plus you get the main benefits of high dynamic range, great colour, and great low light level performance.
So are there any drawbacks to AHD?
Not many, the main one is the delay in changing channel – this is around 2-3 seconds on average, compared to approx. 1 second with traditional CVBS signal systems.
The second is that the night mode kicks in more suddenly. With traditional CVBS cameras the transition between night and day is much slower. AHD goes black and white as soon as the light level reaches a certain Lux level. Most of our AHD cameras this happens at between 1 and 8 Lux depending on camera model. In night mode the camera image will be black and white, with no colour visible. This has advantages though, since the black and white image will be miles more detailed than a colour image with a lot of “noise” to the picture.
Lastly, AHD isn't recommended for trailers due to the fact that the more coils and links you add to the cabling, the more this will affect the very high frequency signal of the 1080P cameras.
Is there any point in selling the CVBS technology still?
Absolutely, CVBS reversing cameras will still be around for many years to come.
When it comes to car stereos, there are only a few models that can support AHD, the vast majority will only support CVBS.
When it comes to full systems, people will appreciate the cheaper cost, the quicker start up/changeover times, and still appreciate the good image quality that our premium CVBS sensors give.
Our summary
As you can see, things are never as simple as they first appear. All we can ask, is that you trust our judgement when it comes to image sensor choice/quality. Leave it to us to road test hundreds of variations, both day and night, before bringing the best to market (working with the factories to improve their product with our experience).
I hope this bit of knowledge has helped inform your product choice.
Power Connection Options
You have the option to add additional leads that plug in to a DC socket on the monitor wiring harness. You will always be supplied with the standard power wire, which gives you a red wire and a black wire to solder / crimp to a power supply.
On the drop down menus you will notice there are two options selectable. One to add a lighter plug, one for a fuse tap. Scroll down for details on each option.
Lighter Plug
Selecting this option adds an additional lighter plug lead - attaches to a socket on the end of the 300cm monitor wiring loom/harness. Some people order this option just to try out there new kit before hardwiring permanently.

Fuse Tap (Mini blade, Standard blade)
Selecting this option adds an additional easy-wire fuse tap lead with built in earth terminal connector.
We designed and had this product produced in 2023, and they have been very popular. We wanted to create something that meant our customers could hardwire a reversing camera system to their vehicle with ease and minimal tools. Fuse taps have already become popular for installing dash cams, so we wanted to make them more popular for reversing camera kits too.
Usually fuse taps have no earth terminal connector and require crimp tools to connect to your wiring - our easy wire fuse tap kits are different. They come supplied with 2M of twin wire (power + earth) attached. The wires can be pulled apart should you wish to earth to an area far from the fuse box.
Choose a fuse that's active when the ignition is on. Remove the original fuse and place it in the empty slot of the fuse tap. The correct rated fuse for the new camera system is supplied already installed in the correct slot. Install the fuse tap (with the two fuses fitted) in to the fuse box (where you removed the original fuse). Lastly, connect the earth terminal to a chassis bolt or screw (or add a new bolt/screw to secure it).
The mini blade is the most commonly seen fuse size on modern vehicles.

Standard blade used to be the most common fuse size installed, and is still commonly seen, even on very recent vehicles.

PDF Instructions
We aim to provide as much information as possible to assist with both the installation and use of our equipment (something we here is very rare nowadays). If you require any further assistance with any aspect of the fitment then please contact us. Also, if you feel anything could be added to our instructions or a sticker produced for the box to assist in guidance, please let us know. We get better with your assistance.
 Click preview image to download the PDF file | For all of our cabled reversing camera kits Our main 4 pin reversing camera kit instructions. We prefer 4 pin screw locking connector cables in our kits for numerous reasons (no canbus issues, stable voltage, ability for always on, reliability, and heavy duty connectors). This downloadable PDF file will give you all the advice you will need. Some of our cameras will come with extra specific guidance or manuals to help that specific install. |
 Click preview image to download the PDF file | MON293GL and MON293BGL Standard Definition High Resolution Mirror Monitor If you choose a mirror monitor kit and you don't select the AHD upgrade option then this monitor will be supplied. It is a great monitor with lots of menu options, lovely colour, adjustable guidelines, and good viewing angle range. |
If you are ordering the Mini Bade or Standard Blade Fuse Tap power option, then please see the further instruction sheet below dealing with this time saving connection method.
 | Instructions for fitting Fuse Taps / Piggyback fuse holders for power supply Our guide on how to correctly install a piggyback fuse holder tap to power a reversing camera system from the fuse box. |
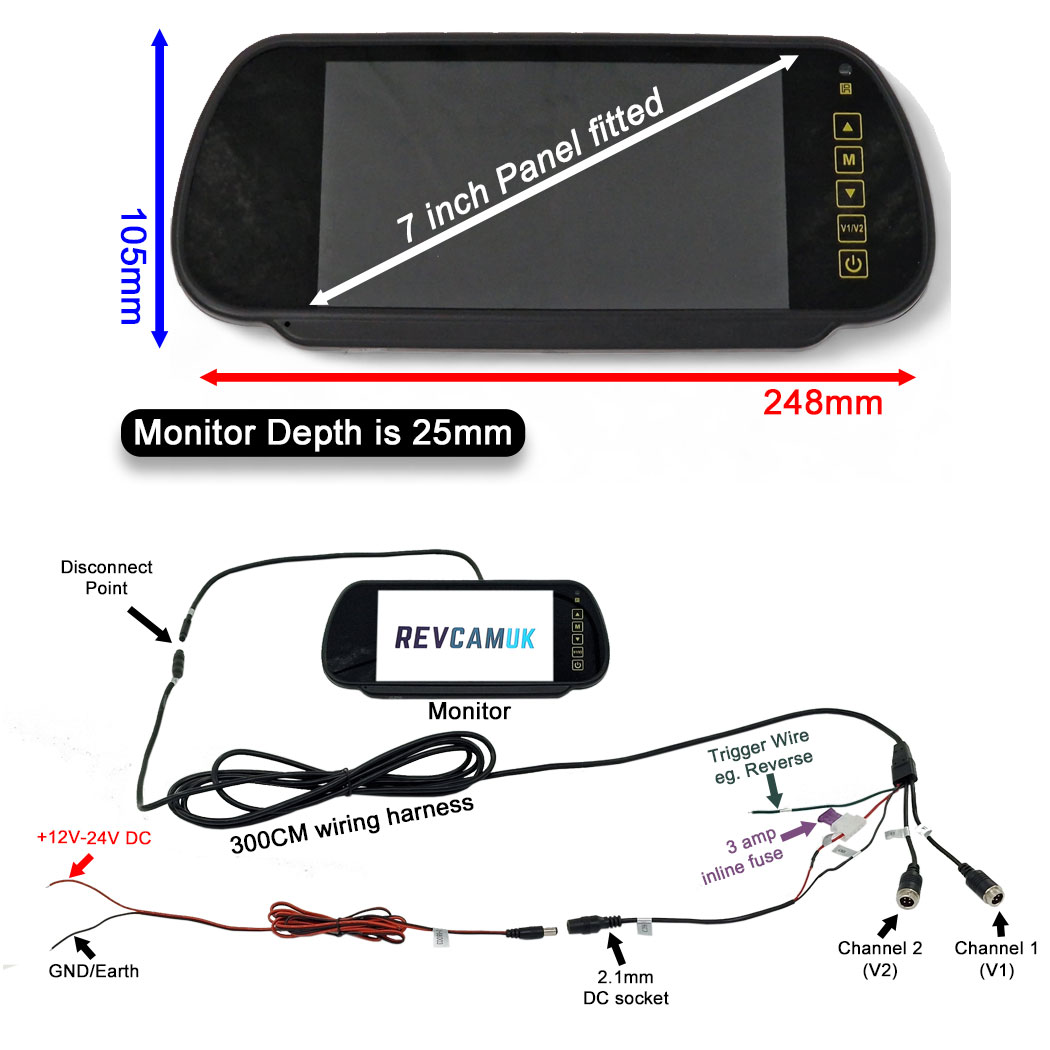
Monitor
7” Diagonally Measured Colour LCD screen
Power supply: 12V/24V
Power Consumption: 7.5W Max
Digital Screen Resolution: 800 x3(RGB)x480
21 LED Backlight (Brighter than other 14 LED versions)
2 Inputs
PAL/NTSC/AUTO
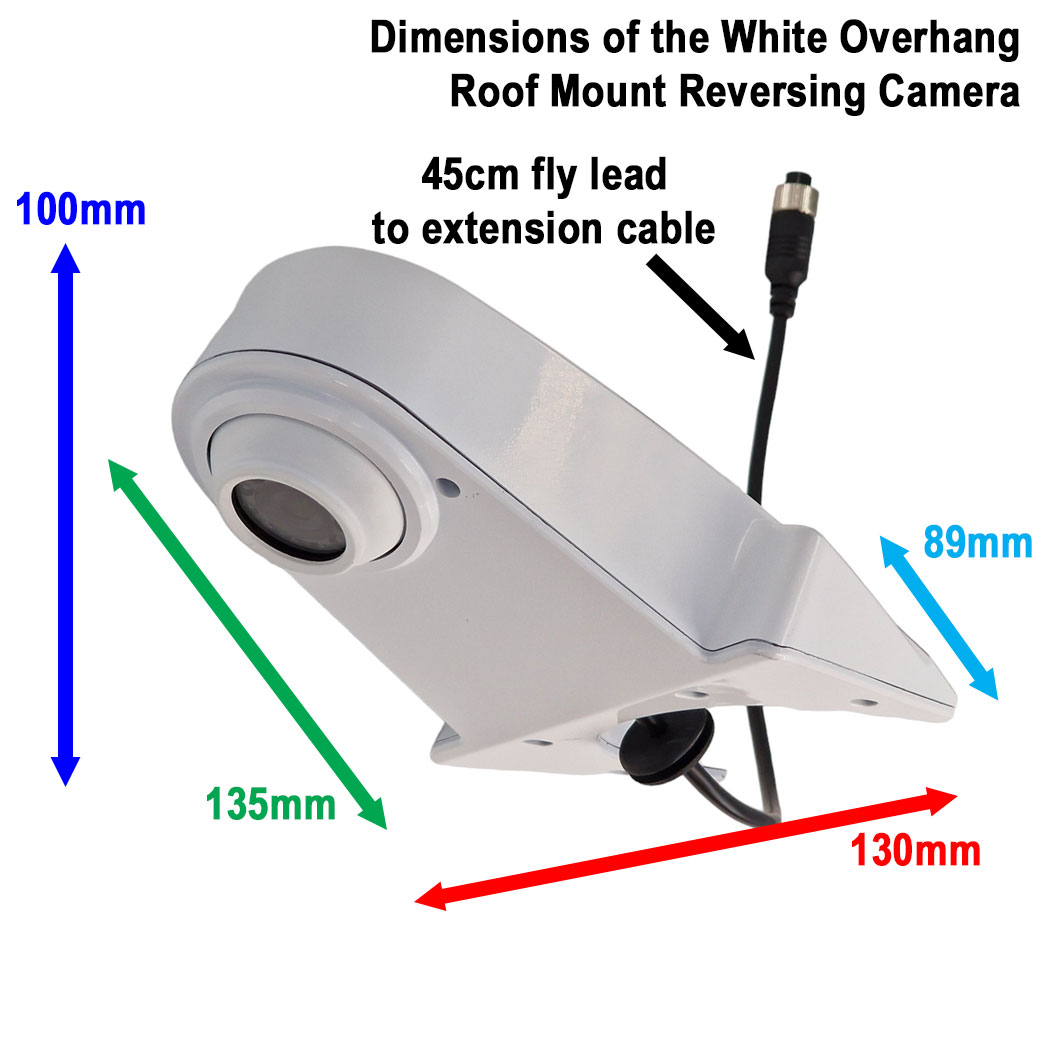
Camera
Image Device:SONY 1/3" 811 CCD 960H 700TVL
TV System: PAL
Effective Pixels: 976*582
Scanning System: 2:1 Interlace
Sync. System: Internal
Resolution: 700 TV lines
Minimum Illumination:0 Lux (IR LEDs on)
Video Output:1.0vp-p,75Ohm
Gamma Consumption: 0.45
AGC: Auto
S/N Ratio: Better than 48dB
White Balance: Auto
Electronic Shutter: 1/50Sec-12.5μSec (PAL) / 1/60Sec-12μSec (NTSC)
BLC: Auto
Current Consumption:100mA
Waterproof to Ip68
Infrared LEDs to provide night view
Mirror image
Mainland UK Shipping
We have three postage options to select from during checkout (on larger items eg kits there will be two options):
Royal Mail Tracked - Smaller / Lighter weight orders. This will be sent via Royal Mails Tracked Service. They will send emails/SMS to inform you of the tracking events. This option won't be shown for heavier weight orders. £3.95.
DPD 2 Day. Small or large orders. This will be sent with DPD Local and should arrive within two working days (if you place the order before 12:30PM). £6.50.
DPD Next Day. Small or large orders. This will be sent with DPD Local and should arrive the following working day (if you place the order before 12:30PM). £7.99.
Highlands and Islands UK Shipping
We offer a 2-3 day service fulfilled with either Royal Mail Post, or Parcel Force. The prices charged are identical to mainland UK. Small orders will be sent via the post, larger orders via Parcel Force.
Outside of the UK Shipping
We shop around when selecting the best method for Europe (we avoid the cheap budget couriers due to parcels being lost). Southern Ireland is always sent via DPD. Other countries will usually be either Parcel Force, UPS, or Fedex. Please note that we require a phone number for international deliveries. Also if you are a company in Europe, a VAT number or EORI number will help speed up customs.
We remove the UK VAT (Tax) when any country other than the UK is selected in the shopping basket or checkout. From this point all prices on the site drop down to exclude VAT. If you are from the Channel Islands, please select Jersey / Guernsey from the country list in order to remove UK sales Tax.
60 day "Change of Mind" policy
We understand that for whatever reason you may need to return your purchase. We provide a 60 day opportunity for you to do just that. Simply give us an email or a phone call to let us know it is due back. You are responsible for the shipping back to us but you will receive a full refund including the original shipping we charged you for your order. We recommend getting a signed for or proof of postage when posting back to us.
All we ask is that you return the items in the condition they were sent in, with the packaging present. You are welcome to have temporarily tested the product and unravelled things, but if you have cut wires, soldered, glued, installed and used for a while then this wouldn't be suitable for returns under the change of mind policy.